Sunday, 23 October 2011

Caramelized Apple Dutch Baby

I haven't been that familiar with dutch babies until recently.  I have made a few but nothing really tickled my fancy.  Today's Caramelized Apple Dutch Baby is a little different, this isn't your run of the mill, everyday type of breakfast Since too much of this will make you the size of a house.  It is delicious and sweet, I might cut the sweetness for my taste but I have a feeling that those with a sweet tooth will enjoy this, a lot!

I adapted a recipe made for an 8" cast iron skillet and I halved the recipe, more or less to fit my smaller 5" cast iron skillet since I think my non-sweet eating man and my kids and I could handle a smaller rather then larger Dutch Baby.

Caramelized Apple Dutch Baby
adapted from The Kitchn.  This will make a 5" cast iron skillet or a med oven safe pan

2 Apples (1 1/2 cups diced), peeled and in a small dice. (I used gala apples since that is what I had available but granny smith would be lovely too.)
2 tbsp Sugar
1/2 tsp Cinnamon
1/4 tsp Ground Ginger
38 gram Butter.  (1/6 cup, now you see why I weighted it :)
1/6 cup Brown Sugar  (This one was easier, take a packed 1/3cup of brown sugar, carefully turn it onto a plate and slice it in half. Use half and return the other half into the sugar container.)
1/4 cup + 1/8 cup (or 2 tbsp) Whole Wheat Flour
1/4 cup Flour
1/4 tsp Salt
1/8 tsp Nutmeg
1/2 cup + 1 tbsp Milk (I add the extra milk to make up the whole wheat flour, plus, I am using 3 eggs since the original called for 5 and I am not great at measuring 1/2 and egg.)
1/4 tsp Vanilla
3 Eggs
Powdered Sugar, to serve.

-Preheat oven to 400.
-In a 5" skillet (6" would work as well) place butter and place it in the oven for 3-4 minutes or until the butter is melted and bubbly.
-In a small bowl mix together sugar, cinnamon, and ginger.
-Sprinkle brown sugar on the melted butter and then top with the apple pieces and sprinkle with the cinnamon mixture. Place back in the oven to caramelize the apples.
-In a medium mixing bowl add flour, salt, and nutmeg.  With a whisk slowly add the milk to the flour mix.  Add the vanilla and add the eggs one at a time, then whisk up the mixture for a minute or two until it is frothy and let stand 5 minutes.
-The apples should be bubbly by now, so pour in the flour egg mixture and bake in the oven for 15-20 minutes or until the center is set and the edges are golden.
-The edges will puff up in the oven and will sink down some once it is pull out of the oven.

I didn't get a chance to take pictures of the process but the end result was rather delicious.  Custardy on the inside and slightly crispy along the edges.

Apple deliciousness.

Wednesday, 12 October 2011

The Pumpkin Play Continues

Mmmm pumpkin,  I know the last few posts have been about pumpkin but tis' the season.

I have one main belief with pumpkin pie, it must contain Mace.  I remember a time when mace wasn't available in Canada. It was thought to be hallucinogenic and when they banned mace spray they also made it impossible to find the spice mace.  I did give up on mace for a year or two when I couldn't find it, it was hard to have pumpkin pie without it.  Now it is back so I make my pie with mace :)

Pumpkin Pie

2 cups Pumpkin Puree (or 1 can - 398ml)
3/4 tsp Salt
1 tsp Cinnamon
1/2 tsp Mace
3/4 tsp ground Ginger
2 dashes Clove
3/4 cup Brown Sugar
2 Eggs
1/2 cup Evaporated Milk or Cream
3/4 cup Scalded Milk

-Preheat oven to 425.
-Scalded milk and let cool slightly.
-In a bowl mix all ingredients until combined and pour into prepared pie crust. (NB. This recipe makes more then will fit in a store bought crust. So either have some extra tart shells available, or make your own crust and place it in a pie plate that is slightly larger then a store bought.)
-Bake at 425 for 15 minutes.
-Bake at 350 for 55-60 minutes

Serve hot or chilled with whipped cream or ice cream.


Thawed pureed pumpkin, this was vintage since it was dated back to 2009.  I thought it was time to use it and it was still good.   Since I freeze pumpkin puree in ziplocs the rectangular pan worked well for thawing it quickly.

Pumpkin and brown sugar, mixed together and ready to go.

I have added the evaporated milk, scalded milk and spices to the pumpkin and sugar mix.  All I need to do is putting into a prepared crust.

I put this one in a pre-made crust but since this recipe makes more then will fit in a pre made crust, I also had to make some pastry dough to fill some small tart shells.

It was lovely since the kids and I shared 1/4 of the pie and the rest went down to the people playing D&D in the basement.

Here is the one of the little tarts that I made with the left over filling with the homemade pastry.

Pastry Dough
Recipe from Simply Recipes

2 1/2 cups All Purpose Flour
1 cup Butter (very cold and cup into 1/2" pieces)
1 tsp Salt
1 tsp Sugar
6-8 tbsp Ice Cold Water

In a food processor add flour, salt and sugar.  Pulse a bit to combine. 

Add butter and pulse 6-8 times, until the mixture resembles coarse meal, with pea size pieces of butter.  Add ice water 1 tbsp at a time, pulsing until mixture begins to clump together.  If you pinch some of the crumbly dough it holds together, it's ready.  If it doesn't hold together, add  a little more water and pulse again.

Remove dough from food processor and place on a clean counter.  Gently shape into 2 flattened disks.  Knead just until the disc forms, do not over knead.  Wrap in plastic wrap and stash in the fridge for at least and hour and up to 2 days.

Remove chilled disc and let sit at room temp for 5-10 minutes to soften the dough enough to roll it.  Roll out on a flour surface.  Carefully place in a 9" pie plate and gently press the dough into the and snip off the sides with 1/2"to 1" over hand.   If I am doing a single crust pie I like to fold it over and crimp it.

Add pie filling.

Then roll out the second disc, same as the first and gently place it on the top, pinch the dough together and trip excess dough.  Fold the top piece over the bottom crust and flute edges using your thumb and forefinger. Score the top of the pie to vent steam.


Wednesday, 5 October 2011

Nothing says Autumn like a Plethora of Pumpkin Recipes!

Tis that time of year when you start to want warm soups, hearty meals and pumpkin..

Um...what?

That's right I said pumpkin, ok that isn't really a surprise.  I know that you are aware of that noble veg and I know that you are faced with pumpkin ever where you go (including that coffee chain that sucks you in to spending $5 a latte for pumpkin deliciousness.)  And that is okay by me.  I love pumpkin all year round, which is why I bake a lot of pumpkin this time of year and stash it in my freezer (I do love my obelisk, which I know doesn't tapper but it is my huge black upright freezer)

One of my favorite muffins is my Pumpkin Millet Muffins, adapted from The Rebar cookbook, although, it really should be called a Pumpkin Oatmeal Millet Muffins since there is more oatmeal then millet.  I have, of course, modified the recipe to fit my tastes but the essentials are still there.  Pumpkin.  Glorious orange Pumpkin.

Blend all the dry ingredients.  Usually I add the oatmeal and millet into the wet ingredients but I was prepping ahead of time and just through those into the dry and it worked fine.

Hello Pumpkin.  Here are all the wet ingredients getting ready for it's date with the dry ingredients.

I used my square muffin tin, which is the perfect size to fit into Ladybugs Lock n' lock container.  I have a square box with four square removable trays and these fit really well :)


Pumpkin Oatmeal Millet Muffins
adapted from The Rebar Cookbook

2 Eggs, beaten
1/2 cup Vegetable Oil
1 cup Buttermilk or (1 tbsp lemon juice in a measuring cup and fill up to 1 cup mark with milk, let stand 5min)
3/4 cup Brown Suga
1/2 tsp Vanilla
2 cups Pumpkin Puree
1 cup Rolled Oats
1/4 cup Millet, lightly toasted in a pan
1 cup Unbleached Flour
3/4 cup Whole Wheat Flour
2 tsp Baking Powder
1 1/2 tsp Baking Soda
1/2 tsp Salt
1/2 tsp Cinnamon
1/2 tsp Ground Ginger
1/4 tsp Freshly Grated Nutmeg

-Preheat oven to 350
-Line and/or Grease 24 muffins cups.  I like my silicon muffin liners but I don't really want to the kids to take them to school so I either take them off before school or just grease the pan, since I never have luck getting muffin liners off muffins or cupcakes.
-In a large bowl combine eggs, oil, buttermilk, sugar, vanilla, and pumpkin, mix until the ingredients are without lumps, add oats and toasted millet.
-In another bowl, add dry ingredients.  Add to wet mixture and gently fold to combine.
-Fill muffin cups and bake for 15-20 minutes or until a toothpick comes out clean.

Is Pumpkin Korean?

I have been running around the kitchen today for a number of reasons.  Firstly we are having some friends over for dinner and we had not decided what we were going to make for dinner until this morning.  But since I had purchased the gochujang and an asian pear for making the bulgogi marinade, I thought it would be fun to do bibimbop since that doesn't have to be spicy since our guests are not know for liking it too spicy (Pepper might be a little much :)

Secondly, the kids are out of granola bars.  I say the kids, but really I mean I'm out of granola bars.  I have been snacking on them as well, much to the detriment of our granola bar stocks.  Luckily they are relatively easy and cheap to make so off I go to make some more.  I have been tinkering with the recipe to make them chewy enough but still stay together.  I know this is one of the things that Ladybug will always eat in her lunch, I make sure there is a supply at the ready for lunches.

Thirdly, it is October and cooking pumpkins are around and fairly inexpensive.  I have to keep my eyes open for the $2 cooking pumpkins that I found last year at the grocery store.  That was an awesome find.  I always cook up a bunch of pumpkins to make into pumpkin puree and freeze it to use all year round.  I love pumpkin pie (which I might also make) and I love pumpkin muffins (which will also make an appearance shortly)  but there are a few things that I still want to try, such as, pumpkin pancakes and I am still trying to figure out a great recipe for a pumpkin latte since I am trying to get out of the habit of $4.75 for a pumpkin spice latte at the coffee shop.

And the day goes on....

Head ache started brewing and the photos stopped being taken but the potatoes were delicious.  Plus, 4 or 7 small wine glasses of pear cider did not help.  But we did have a delicious dinner of Bibimbop, Korean potatoes and pumpkin pie...

What you say, pumpkin pie.  That doesn't sound at all like a Korean dessert, well it ain't but it was still tasty.

Making your own pumpkin puree is not that hard and does not take a lot of effort, just a bit of time and a food processor.  You could do it without the food processor but it does make that much easier.

First you get a sugar pumpkin.  You can use a regular Halloween pumpkin but it will be really watery and you will have to strain it which takes it away from being simple to do.  Here is an sugar pumpkin that I picked up for $0.99/lb but I have found them less expensive when I am lucky

Then I cut them in half, aren't they glorious :)

Now, I don't really like pumpkin seeds to eat and J has on a few occasions eaten enough to make himself sick so instead of prepping to eat them, I prep them to plant them next year.  Yes, I understand what I grown might not look anything like the pumpkins I get since the seeds might be a result of cross pollination, but either way I get a plant and that is good.

I had to show just how orange the pumpkins were.

All cut up and ready to bake.  The little ones in the middle were left overs from last year.  I did bake them up hoping that they would work, but they sort of smelled like cat so into the compost they went.

Pre-baking

Post baking.  Even more orange then they started.

Then I let them cool somewhat and then scoop the delicious insides and place them in the food processor. Let them go for a bit and what you get is.....

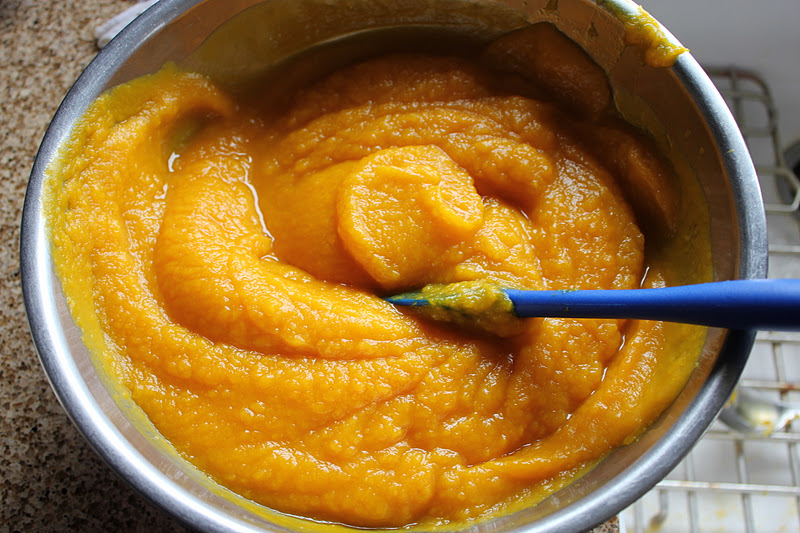
This creamy mass of pumpkiny goodness.  You can if you want strain it so it becomes thicker but I find that this is just as good or better then canned and doesn't have that weird dark orange pumpkin from a can colour.  If using regular Halloween pumpkins you will have to strain it since you need to remove some of the wateriness.  

Pumpkin Puree

Pumpkin(s), cut in half and seeded.
Water

-Preheat oven to 350.
-Line a pan big enough to have the pumpkin lying flat, cut side down.  Not necessary to line the pan but it does make clean up a breeze since the sugars can burn.  Place pumpkin, cut side down and add enough water to cover bottom of the pan.
-Bake 30-60 minutes until the pumpkin is cooked all the way through and soft.
-Once cooked, let cool.  I normally only make it to slightly less then burning my hands otherwise it usually waits until it is stone cold.  I am both extremely impatient and forgetful.
-Using a spoon, scoop out all the flesh leaving the rind out of the mixture and place it in the food processor.  Let the whiz about for a minutes until all the lumps are out and the pumpkin is a smooth puree.
-Use or portion out into freezer bags and freeze flat, which makes thawing and using it later a snap.  I usually put into 2 cup portions and just add more pumpkin to my muffins and pies :)

Saturday, 24 September 2011

And the Day goes on.

Today has been a bit of weird day, but that is not unusual since my husband is out of town and that generally means odd behaviour from the kids.  I know that Rosie is at the age in which she is pushing boundaries and trying nerves.  Plus, we have the addition of the dogs to the mix.  When J is home, he takes the dogs for their 2+ walks a day but when he is out of town it becomes my job to take them to get their exercise etc. 

We took then dogs for their run and then headed out to an outdoor store for their semi annual sale.  I have a thing for merino wool, especially from Icebreaker.  I find the fit really nice and the wool is really soft.  So when I can find it on sale, I do go a little overboard, you should ask my friend Tash who, is usually the recipient of the mail since I usually send it to her house to save on the duty since we travel down often enough to pick it up.  

The sale was pretty good, but the kids were kind of all over the place.  Line ups don't agree with the kids (really they don't agree with adult either but we put up with them as a necessity.)  So the rest of the day went along the line of me: "kids please don't ___."  kids: doing exactly what I have asked them not to do.  Fun day and very exhausting.  So I was really glad when J had arranged for the kids to stay overnight tonight at my parents while he was away this weekend.   

After the sale, Rosie's preschool had their annual picnic so we were planning to head to here at 11.  Rosie fell asleep on the way home from the sale but Ladybug really wanted to go, so I ran in the house and pack a quick lunch and grabbed the stroller and put Rosie in it.  That was probably a bad idea since she woke up once we arrived at the park.  Both kids had a great time (mostly, a few meltdown don't really count, right?) Ladybug met up with friends from when she went to preschool, since their sibs will be in the same class as Rosie (I see play dates in our future, okay I know there will be since we will see them tomorrow.)

Ladybug has a book that she picked up at Grandma's house, it contains a bunch of projects that she wants to try.  We have done one, which was pine cone bird feeders.  The other project that she really wants to do is the terrarium.  So our plan was to pick up steamed milk, then head to get my car washed, and then head to Michael's to see what they had for glass bowls for a terrarium.  My car dealership offers free car washes every Saturday but I thought that it went to 4pm but it only goes to 12pm so drinks in hand we headed off to Michael's.

Besides the fact that the kids were annoying and Rosie was screaming to get out of the cart (which wasn't going to happen since a) she was screaming, b) I didn't want have her grabbing things randomly c) or having her running away since that is always fun for a 2 1/2 year old.)  So I put up with the screaming and got directions to the glassware section.  Surprisingly enough, I found a terrarium bowl with directions.  Sweet, guess what we have in our house right now :)  On a side note, someone also posted a GardenWorks workshop tomorrow on Facebook about terrarium, so guess where I am calling in the morning - I am totally crossing my fingers that there is space in that class tomorrow.

After Michael's I really wanted to drop the kids off but Mum wasn't ready so I had to fill an hour with the kids without blowing a gasket.  I tried Beckwith park but was sorely disappointed at how busy it was, so I was just going to drive around for a bit but I had a hankering for a Red Barn Market sandwich.  I got the kids to pick out some fruit for themselves and I bribed them with a brownie if they behaved (although I didn't tell them what it was but didn't give it to them until they had behaved - so not really bribing right?) We shared a brownie and then it was time to drop off the kids - Yippee!!!

My plan for this glorious kid free evening is rather boring. I went for a run, and it was glorious.  5.5km exploring the neighbourhood.  I added an extra 5 minutes running interval but it was just that good.  I felt recharged and energized by my run and I haven't felt that in a while.  I might go for another run tomorrow or a bike ride, both sound like good options tonight but tomorrow is another day and we will have to see.   I had my sandwich for dinner and I have now had 2 Rock Creek Ciders.  I had pictures of all these delicacies but my camera ate them :(  and so it I :)  

All this time this evening has led to finishing off 2 post, once which is surprisingly long.  I think it might be time to go to bed, perhaps to dream.  I would love to have a good night sleep but I don't think that it will happen for me tonight, maybe next year.  

Mango Madness!

I was introduced to mango chutney while over at a friends house in high school.  Major Grey's Mango Chutney served on a slice of buttered (although, at that time I think it was actually margarine) bread and to this day I still love it that way.  I have gone up in the world (a bit) so now I really like it on a nice sourdough with butter.  
I found some mangoes on sale May last year so I decided to make some chutney and came across this recipe.  Unlike most other recipes that I use, I haven't changed this one at all (okay, accept the cooking time since I like it really thick and the intense the flavour.)  

I recently opened my last jar of the 3 double batches I made May 2010 and a sale on cases of mangoes led to a requirement for more mango chutney to be made.  Greatly over estimating the amount of chopped mango I could get off on of these gigantor mangoes, so it ended up with each mango making 2 cups of chopped mangoes.  With each mango mango equaling 2 cups of mangoes it only took 3 mangoes for each recipe.  I ended up making 3 double batches same as last time, except this time I made them all in one day.


Mango Chutney
6 cups Mango, stoned, peeled and chopped
1 Onion, chopped
1 Red chili, chopped (I use dried small chilies)
1 tbsp Garlic, grated
1 tbsp Ginger, grated
2 cups Brown Sugar
1 cup Raisins
6 Cardamom Pods, crushed and ground
1/2 tsp Ground Turmeric
1/2 tsp Ground Cloves
1/4 tsp Ground Cinnamon
1 tsp cayenne
3 cups vinegar


-Place everything in a large pot and boil until it thickens, about 30-90 minutes.
-Pour into sterilized jars and seal.

To Sterilize the Jars:
-Wash in hot soapy water.
-Keep the lids in boiling water until ready to use.
-Place jars in 225F oven for 10 minutes and keep warm until ready to use.


Lee Valley Tools made the original wood rasp that became the sensation of the kitchen world.  I was one of those people who saw the benefits and versatility of the rasp.  I need to thank my dad for having the lee valley catalog delivered to our house growing up.  It does a bang up job on garlic and ginger.

Ladybug helping crush the cardamom to help remove the pod before crushing the seeds.

I know why cardamom is sold either in the pod or ground - The seeds has the appearance of mouse droppings.

For my third batch, I had prep up everything except the mangoes while the 2nd batch cooked.  This sped up the prep time.


All the lovely ingredients before the mango goes in.

I turned up the heat under the vinegar and other ingredients as I chopped up the mango.

Bubble, bubble, boil and trouble.  Yes, I know that isn't the line from Shakespeare but I had to be careful stirring the chutney.  If I let it bubble too long without stirring, it would start to rapidly boil and sputter when I did stir it.

Gorgeous jars of luscious goodness.

Thursday, 22 September 2011

Yam Doughnut

There is little that is nothing like a doughnut.  It is something I don't make at home for a number of reasons.  I don't like deep frying in the house since it makes a mess and makes the house smell.  I don't really want to know how bad they are for me and if I make them then I know the badness they contain and best ones are time consuming to make. 

So when I saw these little gems, they were the answer to some of these issues.  They are baked rather then fried, they are a little better for you then your average doughnut and plus, they have yam in it and yam is just good.

Now the original recipe called for sweet potato but the images look like yams to me so I made them with yams since I think that would give a lovely flavour, although I am willing to try it with sweet potato.  *For me a Sweet Potato is the light yellow fleshed and tan skinned tuber while a Yam is the orange fleshed and red-ish skinned tuber.*

Spiced Yam Doughnut

1 cup mashed yam total (I used 2 medium-sized potatoes)
3 tbsp unsalted butter (1.5oz)
½ cup milk
2¼ tsp instant dry yeast (I used traditional yeast since your still blooming it)
½ cup granulated sugar
½ cup packed light brown sugar
1¼ tsp sea salt
¼ tsp ground nutmeg
1 tbsp vanilla
1 extra large egg
2 extra large egg yolks
3.5 cups bread flour, plus more for rolling

Cinnamon Sugar Coating:
1 cup sugar
1 tsp cinnamon
4 tbsp unsalted butter, melted

Prick the yam several times with a fork and microwave for 8 minutes, until tender.  Cut the potato in half and scoop the flesh out.  It will be hot. Be careful. Mash it up with a fork.

Melt the butter, and let it cool.

In the microwave (or a saucepan if you’re fancy) heat the milk to just below 105F. Any higher will kill your yeast dead.

In the bowl of a stand mixer fitted with the whisk attachment, let the yeast and warm milk sit for 5 minutes until foamy.  Add the sugar, brown sugar, salt, vanilla, nutmeg, and whisk to combine.  Add the mashed sweet potato, butter, egg and egg yolks, and beat until well combined.

Change to the dough hook, and add the flour.  Mix at medium for 2 minutes, then bump the speed up to medium high and knead until a soft dough forms and the sweet potato dough pulls away from the sides and toward the centre, about 5-7 minutes.  If it doesn’t pull together, add a little bit more flour.

Dump the dough out, form it into a ball, and let it rise on the countertop for 2 hours (don’t be alarmed if it doesn’t rise all that much… it won’t).

Gently redistribute the yeast by kneading lightly, and then roll the dough out onto a lightly floured surface.  ¾ of an inch works. 

Using a circle cutter, gently cut out circles and poke the middles to make holes. If you have a donut cutter like I did, even better! It will do the annoying hole part for you. Place the doughnuts on two parchment paper lined sheet pans, and let them rise for 2 hours, covered with plastic wrap.

Preheat the oven to 400 degrees F.   Bake the doughnuts in the centre of the oven for about 10 minutes, until ther have risen and are golden brown (they should be 200 degrees F on an instant read thermometer).

While the doughnuts are baking, make the cinnamon sugar topping by melting the butter in one bowl, and whisking the sugar and cinnamon in another.  While the doughnuts are hot out of the oven, toss them in the butter, then immediately toss in the cinnamon sugar.


I am lazy when it come to measuring butter, I usually weigh it since I don't need to worry about making it fit in a measuring cup and my husband likes to eat butter by it self, so there is rarely an unmolested block of butter to cut it off of.  This is 1.5 oz of butter or 3 tbsp.

I was a little shy on the yam since that is all I had in the house.

See you still bloom the yeast so traditional yeast should theoretically work as well.

Apparently I didn't mash up the yams sufficiently but the final results were still good.

Here is the ball of prepared dough before its first rise.  It looked pretty much the same after the 2 hours.

My favorite place to leave things to rise - in the oven with the light one. 

It was a little difficult to roll out and I wish I know that these flowers would turn out rather on the large side after baking.

They do look pretty.

Gigantic doughnuts. Since they are baked rather then fried there is nothing to keep the cinnamon sugar coating on, this is why they take a dip in some butter first.  Plus, butter is rather tasty.

I was going with the principle that doughnut holes have no calories, so I had to coat those with cinnamon sugar too.

Tuesday, 20 September 2011

Luscious Lemon

I had a request for lemon bars last night so I decided to make some since we had enough people to devour a pan of lemon bars.  I think the best thing about the request is that he described it as a butter cookie bottom and a key lime pie top that had a nice crust on the top.  He lost me at key lime pie especially since he asked for lemon bars, oh well.

Lemon Bars
From: The Sunset Cookies: step-by-step techniques

1 cup butter, softened
1/2 cup powdered sugar
2 1/3 cup all-purpose flour
4 eggs
2 cups sugar
1 tsp grated lemon peel
6 tbsp lemon juice
1 tsp baking powder
powdered sugar

-In a large bowl beat butter and 1/2 cup of sugar until creamy.  Then beat in 2 cups of flour, blend thoroughly.    Spread mixture evenly over the bottom of a lined 9"x13" baking pan.  Bake at 350 for 15-20 minutes.

-In a small bowl beat eggs until light.  Gradually add sugar, beat until mixture is thick and lemon coloured.  add lemon peel, lemon juice, remaining 1/3 flour and baking powder.  Beat until smooth and well combined.

-Pour lemon mixture over baked crust and return to oven; bake for 15-20 minutes or until topping is pale golden.  Place on a rack to cool; while still warm, sift powdered sugar lightly over the top.

   
Here is the pale golden top of the lemon bars.

Juicy bar all baked and served.

All gone.  The gamers have consumed all the lovely bars.

Sunday, 18 September 2011

Granola Goodness

I have been working on some snacks for Ladybug's lunch since I really want her not to meltdown at every turn.  So, I needed to find some snacks that she will eat, which is harder then you would think.  I have a lovely recipe for chewy granola bars that uses an egg and mild to make them chewy.  I love these bars but the kids aren't that fond of them.  So I found a different recipe to try and this one is a bigger hit, unfortunately I like them a lot too, so I have to try to keep my hand out of the granola bar bin.
I mixed all the dry ingredients.  I have also tried mixing the brown sugar in the wet in my second batch and that works as well.

The wet ingredients. This particular batch contains 1/4c honey, 1/4c agave syrup, 1/2c oil, and 1tsp vanilla.  I am a really big fan of mixing all my wet ingredients in the measuring cup.

The wet meets the dry and then there is a lot of mixing to cover all the dry with the wet.

It doesn't look like much but this is the beginning of goodness.

I like press down all my mixes so that there is even cooking.  To accomplish this I used a bit of plastic wrap and squished it into place.

This is a the baked first batch.  It was in the oven for 40 minutes and it was tasty but not chewy enough.

This is my second batch which was put in the oven for 30 minutes.  This one used large chocolate chips and still lovely really chewy so it was a little crumbly.  I think I might keep the large chips but used fewer of them and I might put it in for 35 minutes.

Here is the lovely baked second batch.  Doesn't it look lovely.


Chocolate Chip Granola Bars (makes about 24 bars)
from: Weelicious.com

4 Cups Old Fashioned Oats
1/4 Cup Whole Wheat Flour
1/2 Cup Shredded Unsweetened Coconut
1/3 Cup Brown Sugar
1 Cup Chocolate Chips ( I found 1c too much, 3/4c is better. Substitute with raisins or other fruit)
1/2 Tsp Kosher Salt
1/2 Cup Canola Oil
1 Tsp Vanilla Extract
1/2 Cup Honey

-Preheat oven to 325 F.
-Combine the first 6 ingredients in a bowl.
-Whisk together all the wet ingredients.
-Pour the wet ingredients over the oat mixture and stir to combine.
-Place granola mixture on a parchment lined baking sheet and shape into a rectangle, about 13 x 9 x 1 inch thick.
-Bake for 20 minutes for chewy bars and 25-35 minutes for crunchier bars.
-Allow to cool for 10 minutes then cut into 3 x 1 inch bars.*
* Individually wrapped, the bars will remain fresh for several weeks.