Showing posts with label Recipe. Show all posts

Monday, 7 November 2011

And the Lasagna Played On.

I tried out a lasagna recipe last week, I like the idea behind it since it was called Roasted Butternut and Sweet Potato Whole Wheat Lasagna, but I found it really sweet and it was quite greasy, delicious but heavy.  So I did what I normally do when it sounds better then it was, I modified it :)

I changed it up considerably from the original recipe, which is not that unusual for me :)  Firstly I found that the  bottom layer of noodles didn't cook properly since there was no tomato sauce, so I cooked the noodles first rather then us no-boil noodles.  Next I decided that it needed something a bit bitter to balance out the sweetness of the pasta, so I added spinach and finally I found that the whole thing was really heavy and greasy so I changed the cheeses and changed the procedure a bit.  I hope you enjoy it as much a I have.  Especially since I made it big since I was expecting a house full of people to eat it and since they cancelled I have a whole big pan of lasagna to eat.

Roasted Butternut Squash and Spinach Lasagna
Heavily modified from thisHow Sweet East recipe

9-12 Lasagna Noodles, whole wheat or white

Squash
1 Medium Butternut Squash, peeled and cubed.
1 Medium Yam, peeled and cubed
1 tbsp Butter
Spray Oil (I have a sprayer filled with Olive oil)
1/4 tsp Fresh Grated Nutmeg
1/2 tsp Salt
1/2 tsp Pepper

Spinach and Cheese
1/2 White Onion, finely diced
3 Garlic Cloves, finely diced 
Spray Oil
1/2 tbsp Butter
1/2 tsp Salt 
1/2 tsp Pepper
2 packages Frozen Spinach, thawed and excess water squeezed
500g tub Ricotta
250g tub 2% Cottage Cheese
1/2 cup Parmesan
1/2 cup Mascarpone Cheese ( I added this because I has some left over from the original lasagna I made)
1 bunch Green Onion
1  Eggs

1 1/2 cups Mozzarella
Sage leaves around 20.

-Preheat oven to 350
-Lay squash and yam on a baking sheet and spritz with olive oil, sprinkle with nutmeg, salt and pepper and toss to coat.  
-Roast approximately 50 minutes, tossing every 15 minutes, remove once the squash and yams are soft and a little golden along the edges.
-Remove from oven and let cool.  Once cool mash with a fork

-Preheat a skillet and spritz with a bit of olive oil, and butter.  Saute onions until translucent and then add garlic and stir until fragrant.  Add spinach and cook for approximately 2 minutes.  Put spinach mixture in a bowl and let cool.
-Once cool, stir in remaining cheeses, green onions and egg.  Mix well.

-Cook lasagna noodles according to directions.

-Start Layering a grease/buttered 9"x13" rectangular pan with noodles, top that with 1/3 of the squash mixture, 1/3 of spinach and cheese mixture and top with 1/2 cup Mozzarella. Noodles, 1/3 squash, 1/3 spinach, 1/2 cup mozzarella.  Noodles, 1/3 squash, 1/3 spinach, rest of mozzarella.

-Bake 45 minutes at 350 or until cheese is browned and lasagna is bubbling.

Squeezed the spinach dry-ish and the onion and garlic is ready to dice.
My helper with her new self cut hair.
Onions sauteing.
Cooked spinach, garlic and onions, cooling waiting for the cheeses, green onion and egg.
Mmmm, cheese, in many forms.
Mashed squash and yam, divided into three lumps for easier assembly later.
All the layers have been added and it is ready to bake.  I plan to put it in so I pull out a hot lasagna when everyone arrives.

See all those lovely layers.

Ready for the oven.
Mmmm, delicious.

You can still see the layers.

Brownies from Heaven :)

I grew up having the best brownies in the world.  I didn't know this at the time but with all the brownies out there, my mother made the best.  They are also rather weird.  I have only made them a couple times and the first time that I did make them, I ignored the "Cover when cool and set aside overnight to mature." line in the recipe.  Wow, I was shocked at how bland they tasted and I thought that was the worst thing ever since I remember these being absolutely fabulous brownies.  So the next day when I actually finished making the brownies and adding the fudgey icing and OMG it was the best thing on earth.  I decided to forgo the unsalted butter and just use saltIed butter this time since I remember it required a bit more salt so I had added a bit of crunchy salt on top of the icing to just send it over the top in greatness.

So decided to makes these delicious goodies for Monday's dinner.  I did forget that I only have 9"x9" square pan so the brownies turned out a little thinner that I like them, what I usually do is double the recipe and put it in the 11"x13" pan.  

Brownies
Recipe courtesy of my mum,

Brownies
4 oz Unsweetened Chocolate
1/4 lb (4 oz, 1/2cup) Butter
1 1/4 plus 3 tbsp Sugar
1 tsp Vanilla Extract
3 large Eggs
3/4 cup All-Purpose Flour

Fudgy Frosting
1 1/2 oz Unsweetened Chocolate, melted
1/4 cup Sugar
1/4 cup Evaporated Milk
16 Pecan halves (Optional, really optional since I believe that Brownies should not contain nuts, although these are decorative for the top and are almost tolerated.)

-Preheat oven 350. butter or line 8"x8" square pan
-In a double boiler, melt butter and chocolate, set aside for 5 minutes.
-In a bowl beat together chocolate and sugar 1-2 minutes until the mixture is completely combined.  Add vanilla, and lightly beaten eggs and mix only until combined.
-Add flour and beat until mixture is totally blended and has a shiny velvety look, 1 minute or less.
-Spread batter evenly over the prepared pan and bake 20-25 minutes.  Bake until a very thin crust forms on the top and a knife inserted in the middle comes out clean or with a few moist crumbs.  DO NOT OVER BAKE.
-Cool in pan on rack to room temp. COVER WHEN COOL AND SET ASIDE OVERNIGHT TO MATURE *this is very important*

Frosting:
-In a blender combine the melted chocolate, sugar and evaporated milk.  Blend for 3-5 minutes until the mixture is smooth and shiny (the sound of the blender will change when the mixture is ready)
-Frost brownies with a thin layer of icing.  To serve cut into 16-2" pieces and top with pecan, if desired.

I use a bowl over a pot of simmering water instead of an actual double boiler pot.  That way there is only one dish to clean.
Here is all the chocolate and butter melted and cooling
In with the sugar. 
The eggs have been added and the mixture is almost complete, all it needs is the flour.
With only a few crumbs on the toothpick it was ready to take out of the oven at around 20 minutes.
Here is my rather thin brownie.  It is still moist and fudgy but I think I will have to pick up a 8"x8" square pan.  I have also sprinkled the top with Himalayan Pink Salt. 

Sunday, 6 November 2011

The Ongoing Adventures with Ginger.

Ginger is one of those ingredients that I like to use sparingly since it has such a strong delicious flavour.  There is one exception to this and that is Ginger Beer.  When we were in the UK for my cousins wedding we came across Crabbies Alcoholic Ginger Beer.  It was the best ginger beer that I had ever tasted and it was alcoholic.  I started having one almost every evening while we were there which is almost unheard of for me, especially at the time since I drank maybe once or twice a month.  

So my husband was having a hankering for Crabbies and we aren't in the UK or apparently Edmonton, which is the only place in Canada that I have seen it.  I would love to get my hands on some but none of my local liquor stores have been able to bring it in, either that or it was too much effort.  Any who, my husband had a hankering and ginger is stupidly cheap in Chinatown so he decided to make his own.  

My husband doesn't do anything half assed, he goes the whole ass.  He didn't just do one batch, he did 4 different batches varying the percentage of white sugar to brown sugar.  He looked at a whole bunch of recipes on line and decided that they didn't ask for enough ginger.  We had done a bunch of batches of ginger concentrate to make ginger ale, so he knew he wanted at lot of ginger in the beer rather then the 1-4 tbsp that most recipes called for.  He ended up using around 400grams of ginger to 2 cups of sugar.

All in all he had 4 batches, 100% white sugar, 100% brown sugar, 50/50 white brown (which is currently my favorite but so far we have tried only 2 of the 4 batches), 25% brown.  

The idea behind this is that this will lead to making bigger batches to put in a keg to then put in the kegerator.  I don't drink beer and that is all that the kegerator has held to date.  Cider is hard to get in the smaller kegs and usually only available to commercial clients (which we are not, although I am sure the we go through more beer then some places, 2 every 2 weeks.)

There are 2 different applications of ginger in this recipe.  First is the ginger which is put through the food processor and then boiled with the water and sugar for 2 hours and then strained.

Here is the chunked ginger ready to go in the bot for boiling.

After it is boiled and strained it is added to the sterilized jugs.  The water is added to thin out the concentrated ginger. 

Then he grates up some ginger to extract the juice from the ginger.
Then the ginger juice is added to the concentrate to add some fresh ginger bite.
Her are the jugs ready for yeast and then it will be time from them to sit and  let the yeast do its thing in the bathtub downstairs, just in case it decides to runneth over :)
After the yeast has does its job, J tasted it and decided it needed more sugar, so he added more sugar and then bottled it into smaller jugs that were sealed and left to carbonize.  

So far we have tasted 2 of the batches and my favorite is the 50/50 blend.

I will post the recipe when we have decided on the perfect ginger beer recipe.

Sunday, 23 October 2011

Caramelized Apple Dutch Baby

I haven't been that familiar with dutch babies until recently.  I have made a few but nothing really tickled my fancy.  Today's Caramelized Apple Dutch Baby is a little different, this isn't your run of the mill, everyday type of breakfast Since too much of this will make you the size of a house.  It is delicious and sweet, I might cut the sweetness for my taste but I have a feeling that those with a sweet tooth will enjoy this, a lot!

I adapted a recipe made for an 8" cast iron skillet and I halved the recipe, more or less to fit my smaller 5" cast iron skillet since I think my non-sweet eating man and my kids and I could handle a smaller rather then larger Dutch Baby.

Caramelized Apple Dutch Baby
adapted from The Kitchn.  This will make a 5" cast iron skillet or a med oven safe pan

2 Apples (1 1/2 cups diced), peeled and in a small dice. (I used gala apples since that is what I had available but granny smith would be lovely too.)
2 tbsp Sugar
1/2 tsp Cinnamon
1/4 tsp Ground Ginger
38 gram Butter.  (1/6 cup, now you see why I weighted it :)
1/6 cup Brown Sugar  (This one was easier, take a packed 1/3cup of brown sugar, carefully turn it onto a plate and slice it in half. Use half and return the other half into the sugar container.)
1/4 cup + 1/8 cup (or 2 tbsp) Whole Wheat Flour
1/4 cup Flour
1/4 tsp Salt
1/8 tsp Nutmeg
1/2 cup + 1 tbsp Milk (I add the extra milk to make up the whole wheat flour, plus, I am using 3 eggs since the original called for 5 and I am not great at measuring 1/2 and egg.)
1/4 tsp Vanilla
3 Eggs
Powdered Sugar, to serve.

-Preheat oven to 400.
-In a 5" skillet (6" would work as well) place butter and place it in the oven for 3-4 minutes or until the butter is melted and bubbly.
-In a small bowl mix together sugar, cinnamon, and ginger.
-Sprinkle brown sugar on the melted butter and then top with the apple pieces and sprinkle with the cinnamon mixture. Place back in the oven to caramelize the apples.
-In a medium mixing bowl add flour, salt, and nutmeg.  With a whisk slowly add the milk to the flour mix.  Add the vanilla and add the eggs one at a time, then whisk up the mixture for a minute or two until it is frothy and let stand 5 minutes.
-The apples should be bubbly by now, so pour in the flour egg mixture and bake in the oven for 15-20 minutes or until the center is set and the edges are golden.
-The edges will puff up in the oven and will sink down some once it is pull out of the oven.

I didn't get a chance to take pictures of the process but the end result was rather delicious.  Custardy on the inside and slightly crispy along the edges.

Apple deliciousness.

Wednesday, 12 October 2011

The Pumpkin Play Continues

Mmmm pumpkin,  I know the last few posts have been about pumpkin but tis' the season.

I have one main belief with pumpkin pie, it must contain Mace.  I remember a time when mace wasn't available in Canada. It was thought to be hallucinogenic and when they banned mace spray they also made it impossible to find the spice mace.  I did give up on mace for a year or two when I couldn't find it, it was hard to have pumpkin pie without it.  Now it is back so I make my pie with mace :)

Pumpkin Pie

2 cups Pumpkin Puree (or 1 can - 398ml)
3/4 tsp Salt
1 tsp Cinnamon
1/2 tsp Mace
3/4 tsp ground Ginger
2 dashes Clove
3/4 cup Brown Sugar
2 Eggs
1/2 cup Evaporated Milk or Cream
3/4 cup Scalded Milk

-Preheat oven to 425.
-Scalded milk and let cool slightly.
-In a bowl mix all ingredients until combined and pour into prepared pie crust. (NB. This recipe makes more then will fit in a store bought crust. So either have some extra tart shells available, or make your own crust and place it in a pie plate that is slightly larger then a store bought.)
-Bake at 425 for 15 minutes.
-Bake at 350 for 55-60 minutes

Serve hot or chilled with whipped cream or ice cream.


Thawed pureed pumpkin, this was vintage since it was dated back to 2009.  I thought it was time to use it and it was still good.   Since I freeze pumpkin puree in ziplocs the rectangular pan worked well for thawing it quickly.

Pumpkin and brown sugar, mixed together and ready to go.

I have added the evaporated milk, scalded milk and spices to the pumpkin and sugar mix.  All I need to do is putting into a prepared crust.

I put this one in a pre-made crust but since this recipe makes more then will fit in a pre made crust, I also had to make some pastry dough to fill some small tart shells.

It was lovely since the kids and I shared 1/4 of the pie and the rest went down to the people playing D&D in the basement.

Here is the one of the little tarts that I made with the left over filling with the homemade pastry.

Pastry Dough
Recipe from Simply Recipes

2 1/2 cups All Purpose Flour
1 cup Butter (very cold and cup into 1/2" pieces)
1 tsp Salt
1 tsp Sugar
6-8 tbsp Ice Cold Water

In a food processor add flour, salt and sugar.  Pulse a bit to combine. 

Add butter and pulse 6-8 times, until the mixture resembles coarse meal, with pea size pieces of butter.  Add ice water 1 tbsp at a time, pulsing until mixture begins to clump together.  If you pinch some of the crumbly dough it holds together, it's ready.  If it doesn't hold together, add  a little more water and pulse again.

Remove dough from food processor and place on a clean counter.  Gently shape into 2 flattened disks.  Knead just until the disc forms, do not over knead.  Wrap in plastic wrap and stash in the fridge for at least and hour and up to 2 days.

Remove chilled disc and let sit at room temp for 5-10 minutes to soften the dough enough to roll it.  Roll out on a flour surface.  Carefully place in a 9" pie plate and gently press the dough into the and snip off the sides with 1/2"to 1" over hand.   If I am doing a single crust pie I like to fold it over and crimp it.

Add pie filling.

Then roll out the second disc, same as the first and gently place it on the top, pinch the dough together and trip excess dough.  Fold the top piece over the bottom crust and flute edges using your thumb and forefinger. Score the top of the pie to vent steam.


Thursday, 22 September 2011

Yam Doughnut

There is little that is nothing like a doughnut.  It is something I don't make at home for a number of reasons.  I don't like deep frying in the house since it makes a mess and makes the house smell.  I don't really want to know how bad they are for me and if I make them then I know the badness they contain and best ones are time consuming to make. 

So when I saw these little gems, they were the answer to some of these issues.  They are baked rather then fried, they are a little better for you then your average doughnut and plus, they have yam in it and yam is just good.

Now the original recipe called for sweet potato but the images look like yams to me so I made them with yams since I think that would give a lovely flavour, although I am willing to try it with sweet potato.  *For me a Sweet Potato is the light yellow fleshed and tan skinned tuber while a Yam is the orange fleshed and red-ish skinned tuber.*

Spiced Yam Doughnut

1 cup mashed yam total (I used 2 medium-sized potatoes)
3 tbsp unsalted butter (1.5oz)
½ cup milk
2¼ tsp instant dry yeast (I used traditional yeast since your still blooming it)
½ cup granulated sugar
½ cup packed light brown sugar
1¼ tsp sea salt
¼ tsp ground nutmeg
1 tbsp vanilla
1 extra large egg
2 extra large egg yolks
3.5 cups bread flour, plus more for rolling

Cinnamon Sugar Coating:
1 cup sugar
1 tsp cinnamon
4 tbsp unsalted butter, melted

Prick the yam several times with a fork and microwave for 8 minutes, until tender.  Cut the potato in half and scoop the flesh out.  It will be hot. Be careful. Mash it up with a fork.

Melt the butter, and let it cool.

In the microwave (or a saucepan if you’re fancy) heat the milk to just below 105F. Any higher will kill your yeast dead.

In the bowl of a stand mixer fitted with the whisk attachment, let the yeast and warm milk sit for 5 minutes until foamy.  Add the sugar, brown sugar, salt, vanilla, nutmeg, and whisk to combine.  Add the mashed sweet potato, butter, egg and egg yolks, and beat until well combined.

Change to the dough hook, and add the flour.  Mix at medium for 2 minutes, then bump the speed up to medium high and knead until a soft dough forms and the sweet potato dough pulls away from the sides and toward the centre, about 5-7 minutes.  If it doesn’t pull together, add a little bit more flour.

Dump the dough out, form it into a ball, and let it rise on the countertop for 2 hours (don’t be alarmed if it doesn’t rise all that much… it won’t).

Gently redistribute the yeast by kneading lightly, and then roll the dough out onto a lightly floured surface.  ¾ of an inch works. 

Using a circle cutter, gently cut out circles and poke the middles to make holes. If you have a donut cutter like I did, even better! It will do the annoying hole part for you. Place the doughnuts on two parchment paper lined sheet pans, and let them rise for 2 hours, covered with plastic wrap.

Preheat the oven to 400 degrees F.   Bake the doughnuts in the centre of the oven for about 10 minutes, until ther have risen and are golden brown (they should be 200 degrees F on an instant read thermometer).

While the doughnuts are baking, make the cinnamon sugar topping by melting the butter in one bowl, and whisking the sugar and cinnamon in another.  While the doughnuts are hot out of the oven, toss them in the butter, then immediately toss in the cinnamon sugar.


I am lazy when it come to measuring butter, I usually weigh it since I don't need to worry about making it fit in a measuring cup and my husband likes to eat butter by it self, so there is rarely an unmolested block of butter to cut it off of.  This is 1.5 oz of butter or 3 tbsp.

I was a little shy on the yam since that is all I had in the house.

See you still bloom the yeast so traditional yeast should theoretically work as well.

Apparently I didn't mash up the yams sufficiently but the final results were still good.

Here is the ball of prepared dough before its first rise.  It looked pretty much the same after the 2 hours.

My favorite place to leave things to rise - in the oven with the light one. 

It was a little difficult to roll out and I wish I know that these flowers would turn out rather on the large side after baking.

They do look pretty.

Gigantic doughnuts. Since they are baked rather then fried there is nothing to keep the cinnamon sugar coating on, this is why they take a dip in some butter first.  Plus, butter is rather tasty.

I was going with the principle that doughnut holes have no calories, so I had to coat those with cinnamon sugar too.

Saturday, 27 August 2011

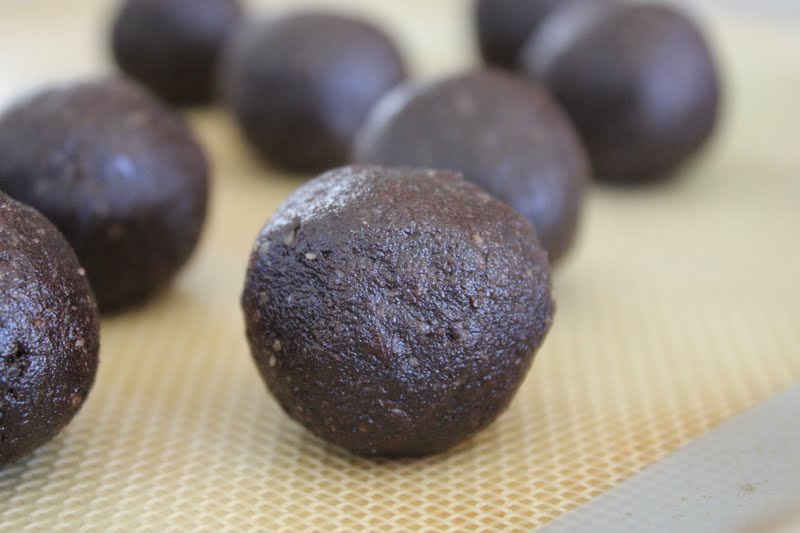
Chocolate Salty Balls.

Ok, they aren't really salty but I couldn't resist making that a title.  These are my first attempt at raw brownies and boy are they good.

Very simple and quick to put together.

Raw Brownies
3 cups Walnuts
1/4 tsp Salt
20 Dates
2/3 cup Cocoa Powder
1 tsp Vanilla

*In a food processor wuzz the Walnuts and the salt until it is a fine crumb.
*Then add remaining ingredients until the mixture starts to ball up in the machine. (I had to add 2 more dates since it was a little dry and didn't really want to stick together well)
*Using a small scoop, form balls and then roll them between your hands until they are the desired shape.  (Obviously, I chose balls)

The walnuts are chopped to a fine crumb, I scrapped the bowl a couple time to stop it from turning the bottom into walnut butter. Th


I added the dates. but wait there's more.

I also added the cocoa and vanilla.

Doesn't that look so chocolatey

Here is the finished product.


Tuesday, 23 August 2011

Mmm Balls

In preparation for Ladybug's start in school in a not that long, I decided that I should make some meatballs.  I did a great job putting it together the meatballs but I forgot the egg and I over baked them.  They were tiny so it didn't much matter that there was no egg but over baking did make them a little dry.  I think that will be okay if I put them in sauce but now I know.

Mini Meatballs
1 lb Ground Beef
1 tbsp Worcestershire Sauce
3 large dashes of Italian Seasoning
salt and pepper
glug of Olive Oil
1/4 onion
2 mushrooms
1 clove garlic
1 crust piece of Bread, 
2 tbsp Milk

*Preheat oven to 375
*In a bowl put the beef, Worcestershire sauce, oil and seasonins.  
*In a small food processor, Wuzz the onion, mushroom, and garlic until finely minced.  Add that to the beef.
*place the crust piece in the processor and wuzz until finely chopped, place in a bowl and add milk (just enough to moisten the bread) and then put it in with the beef
*Gently mix the beef and all the ingredients, try not to mush it up too much since that makes it tough.
*Gently shape into small ball and place then on a lined cookie sheet.
*Bake until just done, maybe 15minutes

Where the beef?  Here's the beef, with all the other stuff added to it.  I just mixed it gently.

Look at all them balls :)

They are probably about 2 tsp worth of meat mix.

All cooked up.